IPv6: Setting up a bridge
With ICANN recently announcing the end of IPv4 addresses to allocate, its time to take a look at the future.
What is IPv6? According to Cisco IPv6 is:
IP Version 6. Replacement for IPv4. A next generation IP protocol. IPv6 is backward compatible with and is designed to fix the shortcomings of IPv4, such as data security and maximum number of user addresses. IPv6 increases the address space from 32 to 128 bits, providing for an unlimited number of networks and systems. It also supports quality of service (QoS) parameters for real-time audio and video.
A typical IPv4 address looked something like this: 74.125.225.17 (One of google's)
An IPv6 Address:
2a00:1450:8006:0000:0000:0000:0000:0068
This can also be wrote as:
2a00:1450:8006::68
The multiple sets of zeros can be represented with an extra colon.
Yeah... Not pretty, not pretty at all. Do I need to switch to IPv6? No you don't. I don't think we'll ever see a complete switch. Your current setup is fine. This is for those of you that actually like learning technology. Learn hands on.
Lets get started! First you will need to choose a tunnel provider. Personally I chose Hurricane Electric's Tunnel Broker. There is also Sixxs, Gogo6, Teredo/Miredo etc.. This guide, only applies to Hurricane Electric's as the rest use a different approach. If you only want to check IPv6 enabled websites out. Go with one of the others. Teredo/Miredo is pretty much point and click.
Once you sign up for an account and sign in, click Create Regular Tunnel.
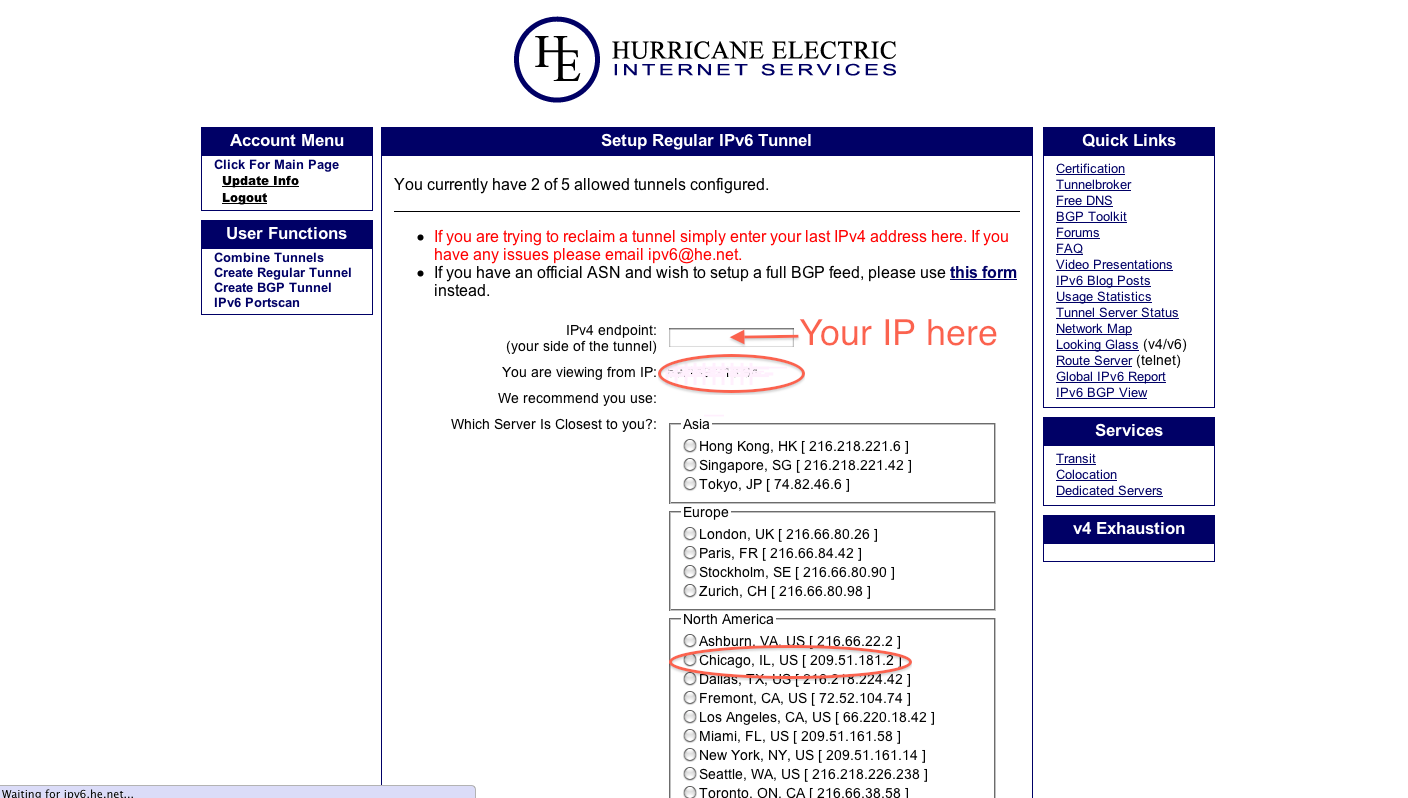
You should see something similar.
Where it says the IP you are view from. Copy and paste that into the IPv4 endpoint Box. Select a server nearest you. For me Chicago is the closest. Click Submit.
If it gives you an error about not being able to reach the ipv4 address. You will need to login to your router and allow ICMP packets through. If you need help finding this let me know.
Once complete you will receive a list of Information for your tunnel. Write this all down. Important for the next step. You should have the information similar to this:
#Tunnel Connection

Server End IPv4:  209.51.191.5
IPv6: 2001:470:d51e:f35::1/64

Client End IPv4: (Your IP)
IPv6: 2001:470:d51e:f35::2/64

#DNS
IPv4: 74.82.42.42
IPv6: 2001:470:20::2

#Routed

2001:470:d51f:f35::1/64
Note: This is not my information. Made the addresses up. But yours should look very similar.
It also has the option to allocate a /48. If you want to setup a firewalled network with clients and servers on different subnets like I am. Go ahead and allocate one.
Now open up a terminal issue:
sudo nano /etc/network/interfaces
Should then look something like that. Run:
sudo /etc/init.d/networking restart
You should now have access. Try browsing http://ipv6.google.com or http://www.v6.facebook.com
Its important to note, that the bridge Ip and your actual ip are only slightly different. So make sure to keep them straight. As the bridge does no more than connect you. The other is your routed subnet of /64. A /64 can have
18,446,744,073,709,551,616 Hosts or devices. Insane right? Compared to IPv4, where your ISP will charge you $10+ for 1 static.
I've enabled IPv6 access to my whole network, and will be continuing in several following posts showing the steps i've taken.
If you have questions/problems, let me know i'd be happy to help in any way I can.
Updates
09/30/2019: Removed link to my subdomain that has since been shutdown